Workflow Manual
Workflow for designing and printing cards with K12Print
Created by Christian N. Hopkins, JHUSOM MD/PhD Candidate Class of 2029
Email: [email protected] – Please reach out if you have any questions!
Note: These instructions are intended to use for printing cards of credit card dimensions (3.375″ x 2.125″) with a horizontal lanyard slot placement from k12print.com. Adapt these instructions at your own discretion.
Included attachments:
Note: Excluding the original template pdf, all attachments have dimensions of 3.465″ x 2.275″ and 800 DPI. These dimensions are larger than the final dimensions of the print (3.375″ x 2.125″) to account for bleed and cutting margins.
- Template Margins.PSD o Photoshop document containing layers for each margin as an overlay as well as folders to paste front and back of your card design
- Template Margin – Safe Zone.PNG
- Template Margin – Cut Line.PNG
- Template Margin – Lanyard Slot.PNG o These are individual PNG images of the margins for the safe zone (where all the critical elements should be kept), the cut line (the actual cut of the final design) and the lanyard slot.
- Everything outside the cut line is the bleed zone for elements you want on edges that extend all the way to the end
- ID Badge 3.375 x 2.125 Template.PDF o PDF of the original template, including both horizontal and vertical lanyard layouts
- ID Badge 3.375 x 2.125 Template (800DPI).PNG o PNG of the original template for horizontal layout only
- Example Template Overlay – FRONT.PNG
- Example Template Overlay – BACK.PNG o PNGs of an example card design front and back with the margins overlayed
- Example Print – FRONT.PNG
- Example Print – BACK.PNG o Images of the printed example card to illustrate final result
Card Design:
Note: When designing the cards, make sure to have the document dimensions be 3.465″ x 2.275″ (and 800 dpi if working in a non-vector-based program like Photoshop). This is to account for bleed and cutting margins.
- https://www.canva.com/ is an excellent resource for designing cards, as they use a vectorbased format and provide many graphics and design templates for free o Canva doesn’t let you create documents with custom dimensions in the free version, so you will need to select the free “business card” template (3.5” x 2”). We will be correcting the dimensions later on in this guide
o To export from Canva, click Share -> Download and choose “PDF for Print”
- You may also use professional design software such as Adobe Illustrator or Photoshop.
o https://www.photopea.com/ is a free, browser-based version of Photoshop that has excellent functionality and can be used if you do not have Photoshop.
- Cards can also be designed in PowerPoint or Google Slides and exported as a pdf. Remember to change the document to the appropriate dimensions.
Template alignment:
Note: These instructions are designed for use with the free image editing site https://www.photopea.com/. However, any layer-based image editing software may be used.
- Go to Photopea and open Template Margins.PSD
- With the “FRONT” folder selected, click File -> Open & Place and select the design for the front of your card. Repeat using the “BACK” folder for the design for the back of your card.
- If the file dimensions of your design are 3.465″ x 2.275″, then your image should automatically align correctly with the edges of the document
▪ If it doesn’t align, then the dimensions of your design may be different than 3.465″ x 2.275″, in which case either adjust your original design in whatever software you used to make it or adjust it directly in Photopea.
- If you used Canva, then the margins won’t line up since Canva doesn’t offer credit card dimensions for their files when using the free version
- You can transform your image directly in Photopea using Edit -> Free Transform
▪ If it does align but looks blurry, then the resolution of the file for your design may be too low. 3.465″ x 2.275″ at 800 DPI is the equivalent of 2767 x 1818 pixels. Adjust the resolution of the file of your original design
- Check to see if your design fits within the margins as expected o All the critical graphics should be inside the blue line
- If you want graphics to extend to the edge of the card, make sure that they extend into the bleed zone past the cut line
▪ See Example Template Overlay – BACK.PNG for an example of bleed
- If the margins fit, then you are ready to submit!
- If the margins don’t fit, re-edit your design in the original program used for the design and repeat from step one of this section or edit directly in Photopea o If editing in Photopea, remember to export your designs WITHOUT the overlaying margins
▪ Hide the margin layers by clicking the “eye” next to the layer
Submitting to K12Print:
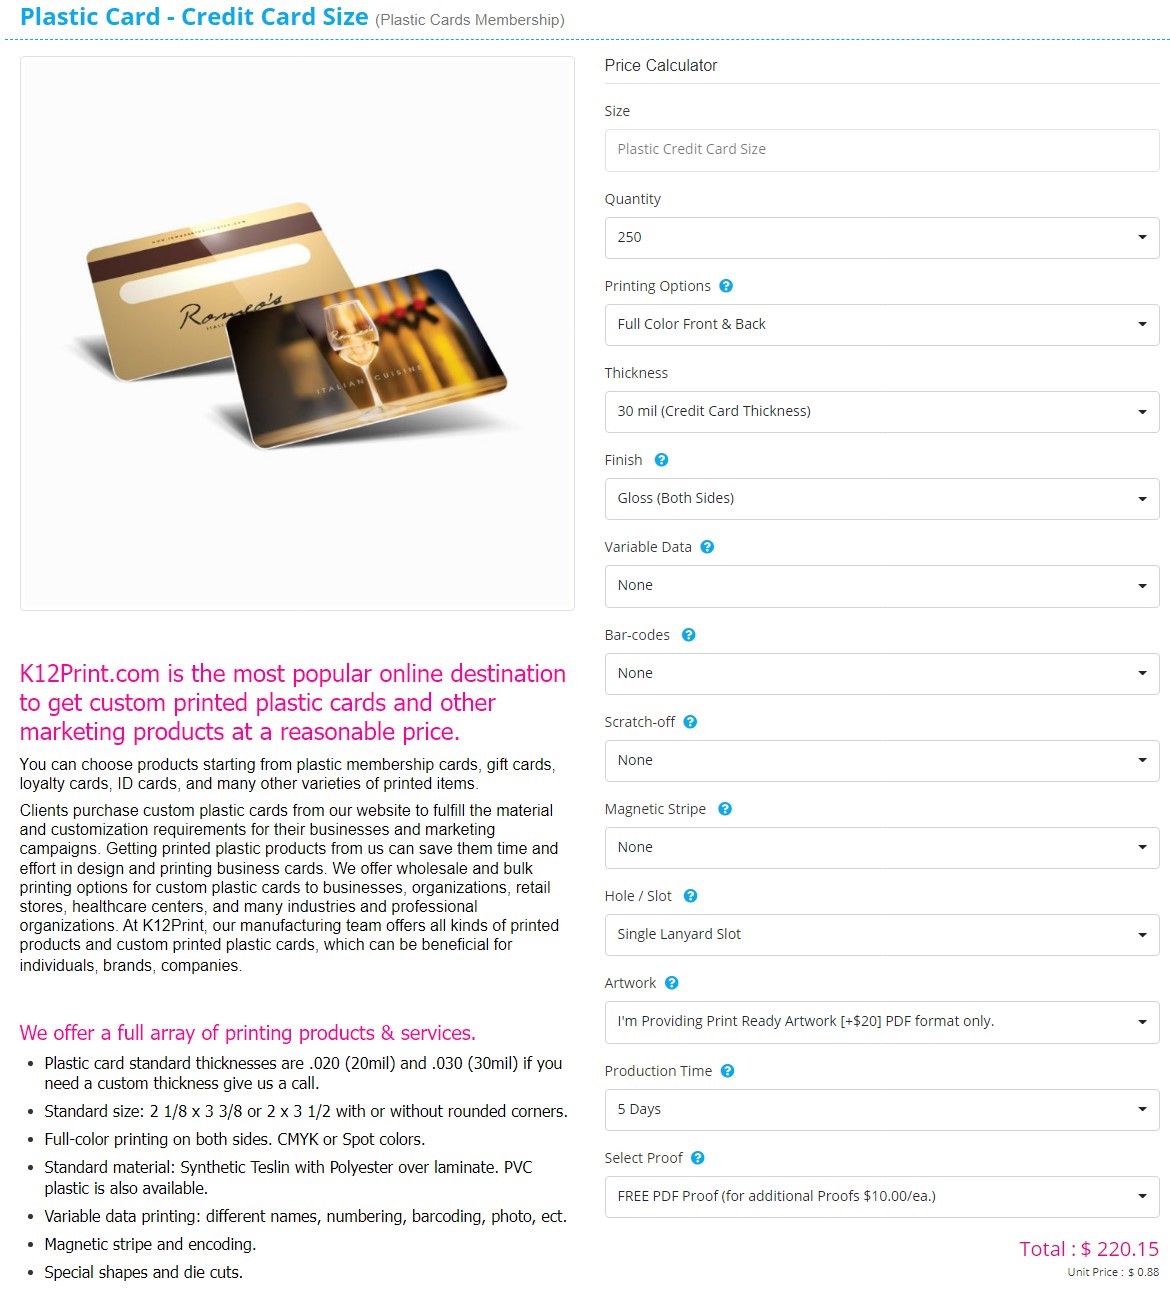
Note: These are just the settings that we chose to print out cards. Feel free to customize your own order as you see fit.
- Go to https://www.k12print.com/
- Select All Products -> Plastic Card – Credit Card Size For our order, we used the following settings:

- Follow the remaining steps to upload your artwork and submit payment and shipping details o There is no option to select whether the lanyard slot goes on the long or the short edge. There is a space for comments during the order process, so you can let them know there.
- Wait for your beautiful cards to arrive!

